|
WHAT YOU WILL NEED: 3.5mm hook Scissors Flotte Sock Patagonia yarn or other DK weight yarn 8mm safety eyes Stuffing Black Yarn Ribbon Darning Needle ABBREVIATIONS: sc: single crochet dc2to: decrease 2 together dc3to: decrease 3 together Head: In a magic ring, chain 1. Round 1: Sc 6 Round 2: 2sc in each stitch (12) Round 3: *1sc in next stitch, 2sc in next stitch. Repeat from *. (18) Round 4: *1sc in next 2 stitches, 2sc in next stitch. Repeat from *. (24) Round 5: *1sc in next 3 stitches, 2sc in next stitch. Repeat from *. (30) Round 6: *1sc in next 4 stitches, 2sc in next stitch. Repeat from *. (36) Round 7: *1sc in next 5 stitches, 2sc in next stitch. Repeat from *. (42) Round 8: *1sc in next 6 stitches, 2sc in next stitch. Repeat from *. (48) Rounds 9-14: Sc in every stitch. (48) Put safety eyes between rows 8 and 9 with 5 stitches apart. Round 15: *1sc in next 6 stitches, dc2tog. Repeat from *. (42) Round 16: *1 sc in next 5 stitches, dc2tog. Repeat from *. (36) Round 17: *1sc in next 4 stitches, dc2tog. Repeat from *. Fill the head with stuffing. (30) Round 18: *1sc in next 3 stitches, dc2tog. Repeat from *. (24) Round 19: *1sc in next 2 stitches, dc2tog. Repeat from *. (18) Round 20: *1sc in next 1 stitch, dc2tog. Repeat from *. (12) Slip stitch to the first stitch and fasten off. Make sure that there is a long tail to sew on the body. Body: In a magic ring, chain 1. Round 1: sc 6 Round 2: 2sc in each stitch (12) Round 3: *1sc in next stitch, 2sc in next stitch. Repeat from *. (18) Round 4: *1sc in next 2 stitches, 2sc in next stitch. Repeat from *. (24) Round 5: *1sc in next 3 stitches, 2sc in next stitch. Repeat from *. (30) Round 6: *1sc in next 4 stitches, 2sc in next stitch. Repeat from *. (36) Round 7: *1sc in next 5 stitches, 2sc in next stitch. Repeat from *. ( 42) Round 8: *1sc in next 6 stitches, 2sc in next stitch. Repeat from *. (48) Round 9: *1sc in next 7 stitches, 2sc in next stitch. Repeat from *. (54) Round 10: *1sc in next 8 stitches, 2sc in next stitch. Repeat from *. (60) Rounds 11-16: Sc in each stitch (60) Round 17: *Sc in next 8 stitches, dc2tog. Repeat from *. (54) Round 18: Sc in each stitch (54) Round 19: *Sc in next 7 stitches, dc2tog. Repeat from *. (48) Round 20: Sc in each stitch. (48) Round 21: *Sc in next 6 stitches, dc2tog. Repeat from *. (42) Round 22: Sc in each stitch. (42) Round 23: *Sc in next 5 stitches, dc2tog. Repeat from *. (36) Round 24: Sc in each stitch. (36) Round 25: *Sc in next 4 stitches, dc2tog. Repeat from *. (30) Round 26: Sc in each stitch. (30) Round 27: *Sc in next 3 stitches, dc2tog. Repeat from *. (24) Round 28: Sc in each stitch. (24) Stuff body. Round 29: *Sc in next 2 stitches, dc2tog. Repeat from *. (18) Round 30: Sc in each stitch. (18) Round 31: *Sc, dc2tog. Repeat from *. (12) Round 32: Sc in each stitch. (12) Slip stitch in the first stitch and fasten off. Ears: Make 2 In a Magic ring, chain 1 Round 1: Sc 3. Round 2: 2sc in each stitch. (6) Round 3: *Sc, 2sc in next stitch. Repeat from *. (9) Rounds 4-6: Sc in each stitch across. Slip stitch in first stitch and fasten off. Make sure there is a tail long enough to sew onto the head. Do not stuff. Tail: In a magic ring, chain 1. Round 1: Sc6. Round 2: *Sc, 2sc in next stitch. (9) Rounds 3-18: Sc in each stitch. (9) Fill the tail with stuffing. Round 19: Sc in next 3 stitches, dc3to, sc in next 3 stitches. (7) Rounds 20-21: Sc in each stitch (7) Slip stitch in the first stitch and fasten off. Make sure there is a long enough tail to sew onto the body. Legs: Make 2 In a Magic ring, chain 1. Round 1: Sc 6. Round 2: 2 sc in each stitch. (12) Round 3:Sc in next five sc, 2sc in next 2 stitches, sc in next 5 stitches. (14) Round 4: Sc in each stitch. (14) Round 5: Sc in next 5 stitches, dc2to 2 times, sc in next 5 stitches. (12) Stuff foot. Rounds 6-10: sc in each stitch. Slip stitch in the first stitch and fasten off. Leave tail for sewing Stuff rest of leg. Arms: Make 2 In a magic ring, chain 1 Round 1: Sc 6. Round 2: 2sc in each stitch. (12) Round 3: *1sc, 2sc in next stitch. Repeat from *. (18) Round 4: Sc in each stitch (18) Round 5: *1sc, dc2to. Repeat from *. (12) Stuff paw Round 6-19: Sc in each stitch. (12) Stuff the rest of the arm Round 20: *Dc2tog. Repeat * 6 times. (6) Attaching: Sew the Head onto the body and stuff, if necessary for the neck. Sew arms on row 31 of the body. Also, stitch row 4 of the arm onto the body where it naturally falls. Attach the tail on the body on the same row where the bottom of the arms fell. At row 11 of the body, sew the legs onto the body. 5 rows above the last row of the tail, tie to the body. At row 2 of the head, sew ears on the head. With black yarn, sew on the nose and mouth on the head to finish off the face as well as the whiskers. Tie the ribbon on the neck. 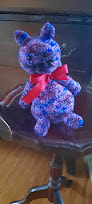
0 Comments
Material
Loops & Thread Impeccable Butterscotch (Or something similar) Embroidery Thread: black and orange 5mm Hook Stuffing 0.75 mm hook (optional for beak) Darning needle Stitch marker Abbreviations: Sc: Single crochet Sc2to: Single Crochet 2 together This pattern is done in a continuous round. Body Round 1: In a magic ring, 6 sc. Round 2: 2 sc in each stitch.(12) Round 3: 2 sc in each stitch. (24) Round 4: Sc in next 11 stitches, 2sc in next 2 stitches, sc in remaining 11 stitches. (26) Round 5: Sc in next 12 stitches, 2sc in next 2 stitches, sc in remaining 12 stitches (28) Round 6: Sc in next 13 stitches. 2sc in next 2 stitches, sc in remaining 13 stitches (30) Round 7: Sc in next 14 stitches. 2sc in next 2 stitches, sc in remaining 14 stitches (32) Rounds 8-10: Sc in each stitch. (32) Round 11: Sc in next 14 stitches, sc2to, sc2to, sc in remaining 14 stitches (30) Round 12: Sc in next 13 stitches, sc2to, sc2to sc in remaining 13 stitches (28) Round 13: Sc in next 12 stitches, sc2to, sc2to, sc in remaining 12 stitches (26) Round 14: Sc in next 11 stitches, sc2to, sc2to, sc in remaining 11 stitches (24) Round 15: *Sc2to. Repeat from * around (12) Stuff firmly. Round 16: *Sc2to. Repeat from * (6) Fasten off. Head: Round 1: In a magic ring, 6sc. Round 2: 2sc in each stitch (12). Round 3: *Sc in next stitch, 2sc in next stitch. Repeat from * around (18). Rounds 4-6: Sc in each stitch. (18) Round 7: *Sc in next stitch, sc2to next stitch. Repeat from * around (12). Stuff Round 8: *Sc2to. Repeat from * around (6). Fasten off with a tail Sew head and body together. Stuff a little more for the neck if needed. Wings (make 2) Chain 4. Row 1: Sc in each stitch starting from second ch from hook, chain 1, turn. (3) Row 2: Sc in each stitch. In last sc, 2sc. DO NOT TURN as you will be working on the other side as well. Sc in the other side of the row, You will have four single crochets on one side and three on the other side. Chain 1, turn. (7) Row 3: Sc in the first 3 stitches, 2sc in next stitch, sc in the next three stitches. Chain 1. (8) Row 4: Sc in each stitch across, including the unworked side. Slip stitch in the first sc and fasten off with a short tail for sewing. Sew wings 8 rows above the starting round of the body Eyes: (make 2) Round 1: In a magic circle, Sc 6. Fasten off with a tail to sew on the face. Beak: with orange embroidery thread, you can either sew in the beak OR crochet the beak using a 0.75 mm hook Chain 7. Row 1: Sc across in second ch from hook (6). Row 2: Sc2to, sc in next 2, sc2to (4) Row 3: Sc2to next 2 stitches (2) Row 4: Sc2to (1). Fasten off and leave tail. Sew on head. I know, I know, I know. I haven't posted a blog post in over a year..... But there is a reason for that! I've been in school since January for Office Admin-Health Services and have been busy with that! Since I have been busy with school, I haven't been crocheting nearly as much as of late. But I did manage to spend some time to catch up on my crocheting prior to my most recent craft show at the end of November. And now that finals are over this term and I'm now officially on winter break from school, I'll be able to catch up on making Christmas gifts! WHOOP WHOOP!
I have also been trying to get inspired by things around me for new patterns. I even have a pattern that is due for release just before Christmas! Who's excited? I know that I am! I am hoping to get inspired throughout the holidays as I see different patterns in clothing and apparel this year. Hopefully that happens and I will start planning new patterns and get them tested! I hope that you all have a great holiday season this year and that 2019 has been kind. You are loved, Natalie About this Pattern:
This pattern uses the Elizabeth stitch, single crochet, and double crochet. This pattern takes about an hour to work up and is super easy to do. You will need a 4.5mm hook and 100% cotton for this project. I used Barnat Handicrafter Cotton. What You will Need: 4.5mm hook Barnat Handicrafter Yarn (Or any other 100% cotton yarn) Scissors Tapestry Needle Pattern: Chain 21. Row 1: Starting from the third chain from the hook, insert hook, yarn over, pull through, yarn over, insert hook in the same chain and pull up a loop. Yarn over and pull through all four loops. *Chain one, skip one chain. Insert hook in the chain beside the skipped chain, yarn over and pull through. Yarn over and insert the hook in the same chain, yarn over and pull through. Repeat from * until you are on the last stitch. Chain one, turn. Row 2: Starting from the first chain, *insert hook, yarn over and pull through, yarn over, insert hook in the same stitch, yarn over and pull through so you have four loops on your hook. Yarn over and pull through all four loops. Repeat from * until the end of the row. Chain one, turn. Rows 3-21: Repeat row 2. Chain one and do not fasten off. Starting after row 21, you will be working in a round. Round 1: In the Chain one, sc 3. Sc in each of the stitches of row 21 until you get to the last stitch. Sc 3. Along the side, evenly sc 21 stitches. Sc 3 at the corner. Along the bottom, sc in each stitch until you get to the last stitch. Sc 3. Sc 21 along the side. Slip stitch in the first of the 3 single crochets. Chain 2. Round 2: In the first chain of the 2 chains, do 1 Dc. 3Dc in next stitch, dc in each stitch across until you get to the next corner. 3Dc in the centre of the corner, dc in each stitch until you get to the next corner, where you will do 3dc in the centre of the corner from the previous round. You will do this until you go all around the dishcloth. You will slip stitch the top of the first dc. **Optional step**. If you want to have a loop on the corner of your dishcloth for easy hanging, chain 10 then slip stitch in the same stitch. Fasten off and weave in all ends. It's the busiest time of the year for us makers. Prepping for craft hows and markets can be difficult. Especially when you don't know where to begin! I have asked around to several people and asked what they wanted to know if they are thinking about doing craft shows in the future and what veteran vendors wish they knew when they first started. there are a lot of things that newbie vendors want to know. And quite frankly, they are good things to wonder about when it comes to markets and craft shows. And I'm sure the same things go with veteran vendors as well! But let's start things off with the newbie vendors. Here are some of the popular things that I have been asked when it comes to being a vendor and looking for craft shows/markets.
How do I find fairs/markets? How do I actually become a vendor? Well, the answer to this is more simple than you may think. Let's start off with finding fairs and markets. One way of finding them is online. There are sites like Kijiji and Craigslist that you can easily find craft shows. I have had success last year and this year with finding craft shows by searching on Kijiji. I have several saved searches on my Kijiji app that will notify me when there are new postings searching for vendors for upcoming shows. I've saved things like "vendor" and "craft show" among other saved searches. You can also look on Facebook to see if there are any groups that share craft shows in your area that may be looking for vendors. You can also look on Facebook Marketplace. Facebook Marketplace works just like Kijiji and Craigslist and other similar sites. Once you find the shows you're interested in, message the person who posted the ad and introduce yourself. You could say something like "Hi. My name is Natalie (you'd insert your name here of course!) and I'm interested in your event. I crochet several items and I feel like I would be a good fit for the event. Feel free to send me some information in regards to your event and I will fill out your application." The next step after showing your interest is filling out the application. In this step, you'd be filling in your name, contact information, what you will be selling, how many tables you would need (some places will offer an option of a 6 foot table and an 8 foot table. In the applications that I have filled out, there as always been an option of 1 or 2 tables with 1 or 2 chairs), and, if you have one, a business name. You will also see the table fee on the application and the time/date of the event as well. The time/date would have also been included in the ad for the vendors. With that being said, that brings me to the next question for newbie vendors. How much should I spend on table fees? When you're first starting out, you don't want to spend to much on your table fee. For my first craft show last year, I spent $40 Canadian on my table. I didn't sell a lot of stuff. I made roughly $80. So I made back what I had spent on my table plus some of my supplies. Mind you, my table wan't displayed the best. Meaning, it was over crowded with my inventory. My brother's Godfather even came up to me a few weeks after I had done this show and we had a conversation about this very topic and I'm glad that he did! He sells his woodturnings at craft shows (and he's really good at it!) and he's done it for long enough that he is able to afford to go to the craft shows and markets that sell their tables at $100 EACH! He even told me that since I am just starting out, it wouldn't be worth my while to start out with shows and markets that sell their tables that much. I totally agree with what he said now that I have had a craft show under my belt. So my advice for those novice craft show/market vendors, don't go for the markets that charge an arm and a leg for their table fees. Start off with ones that are in the $30-$50 range and are one day events and don't be discouraged if you don't make that money back at your first market. How Big of a Space Should I Get? When you apply for craft shows, they typically give you two options. One six foot table or two six feet table. Normally they will say that one six foot table is $40 but if you get two, it will be $70 for example. There could also be an option where you could choose between a 6 foot or an 8 foot table. For your first couple of shows, you'll probably want to choose one table unless you are planning on selling things that take up a lot of room. Am I allowed to bring a garment rack? It will have to depend on what the host of the market says on the application or the ad for vendors. If it does not state something like "We kindly ask that you do not bring any additional displays for the show" (which means no garment racks or anything else), then you will need to ask the host what their policy is. It may be a matter of whoever typed it up forgetting to put that in the application or not. If it is the result of someone forgetting to mention that in the application, expect a mass email to all the vendors with them telling you that they don't want you to bring anything else and that everything must be on the table. If the host gets back to you saying that it is okay to bring a garment rack or any other display other than the table that you already bought, then it is up to you to bring the additional displays. How do I find out about the hours of the event? Typically, the hours of the event will be posted in the initial vendor call from the host(s). If it doesn't say in the initial vendor call, it will be on the application of the market when you apply along with when you are able to come in and set up. For an example, I had a market on November 4th from 11-3 EDT. I had to be there by 9:30 to set up my table. I knew the hours of the event before I applied, just not when I actually had to be there to set up. Do you bring your own table? To some markets, you do while other venues provide you with one. I brought my own table to my show on November 4th, although I could have rented a table at the location. However, if a venue gives you an option of renting a table for the event or not, they will typically give you a reduced rate if you bring your own table. For example, they may offer $40 for a 6 foot table OR $35 if you bring your own. Am I able to decorate the table any way that I want? YES! Yes you can. As long as you follow the guidelines presented to you by the host. If they allow you to have garment racks, that can be part of your display. If not, then go without. If it doesn't say one way or another, then email the host and ask. Will the provide security? In my experience, they never provided security. But it depends on what kind of craft show you are doing and how big it is. If you are doing an outdoor festival during the summer or if you are doing a large show like The One of A Kind show in Toronto, then chances are, there are some kind of security, via a private security company or police officers for crowd control. Target Market Research. Why is it important? Think of it this way. If you are in a population where there are plenty of young families and/or senior citizens, chances are, you're probably wanting to put in some children items like toys and children's hats. If you are doing a show somewhere that doesn't have young children or senior citizens looking to buy something for their grandkids/great-grandkids, you're probably wanting to forgo the children items. In order to know exactly what kind of market you are going for, go to other markets before you even apply for shows. If you are thinking of doing shows in the 2018/2019 season, you're probably to late for applying. But you can always go to the shows in the area and ask the vendors! Product Selection and Variety. The Make or Break for your booth! This goes hand in hand with the last point. After you are done with your market research, you will want to think about your product selection. This is EXTREMELY crucial for your brand as a maker when it comes to shows. Not that there isn't anything wrong with wanting to make everything you want to. But you need to be selective when it comes to your selection. When it comes to Christmas markets, you'll want to have it based in where you live. In Canada, you can find hats, scarves, and/or cowls at almost holiday market you go to as well as stocking stuffers! You don't want to go overboard with the selection of what you want to do. If you are planning on making hats, scarves, and cowls, maybe choose two patterns for each thing. Then you will want to choose about three different colours then make about three or four of the item in each colour. That way, you have a selection of the item AND a variety of colours for your customers to choose from. The same thing goes with stocking stuffers or anything else you want to make. Product Storage and Organization. Is this as important as I think it is? Oh, heck yes! It is important as you think it is plus more! You will want to make sure that you have big storage bins for your storage when you aren't at your craft shows and for transport to and from your shows. When it comes to storage, make sure that you are organized when it comes to what you put in the storage bins. If you are making hats, make sure that all of your hats are in the same storage bin so that you know where they are the next time you go and get the hats. You'll also want to make sure that you have an area in your home to store the storage bins when you aren't prepping for your shows. I hope all of this helps you in your journey of becoming vendors! Leave a comment below with what you wish you would have known when you were first starting out as a vendor! As you can tell, I have a few free patterns already available! And they had to go through many edits to see what worked and what didn't work. Not to mention numerous edits on the written pattern. As I am curtently working on numerous patterns at the moment, I need a good group of crocheters to test out some patterns that I have in the works. One still needs to be written out still and I'm currently making a chick.... just in time for Easter (It's on April 1st this year, just as an FYI).
So anyways.... I'm currently trying to build up a database for my pattern testers. I'm currently looking for crocheters of all skill levels and have a good sense of humour. The crocheters need to be willing to expand what they are comfortable with as well as give me feedback and/or questions to help me edit the written pattern prior to release. The crocheters that I need must also be able to finish the pattern in a timely manner as I hope to release the pattern up to a week after I recieve any and all feedback as I will need to edit the pattern before the release. Also, the crocheters must also be informed that posting pictures of the pattern(s) in question at the time of being tested are allowed to be posted on social media as long as I am being tagged in the post and/or the hashtag #thecrochetaholic is being used. Any pictures of the written pattern or sharing of the pattern is strictly prohibitted prior the release of the pattern as I have chosen a select few during each pattern testing. Any violations of this request will result in your removal as a pattern tester. With that being said, I hope that anyone who is considering to be a pattern tester will understand and, if chosen, follow these rules and requests. Now off to the part where you can apply!! Any and all candidates must email me the answers to [email protected] 1) How long have you crocheted for? 2) Why would you think you would be a good pattern tester? 3) Apples or Bananas? 4) Have you tested a pattern before? 5) What can I do for you as a pattern designer? 6) What can I expect from you, as a pattern tester? 7) Tell me about yourself! I want to know more about potential pattern testers! Thank you in advance for applying for those who wish to become a pattern tester! Good luck! What you need:
Fingering weight yarn Scissors 4mm hook Yarn needle Pom Pom (optional) Directions Brim: Chain 26 Row 1: *Sc, skip 2, 5dc in the next stitch, skip 2. Repeat from * until there are 3 chains left. Sc in the last chain. Row 2: Chain 3, turn. 3 dc in sc. *Skip 2, sc in the middle of the 5dc, skip 2, 5dc in sc. Repeat until the last 5dc. 3dc in the last sc. Row 3: Chain 1, turn. *Sc in first stitch, skip 2, 5dc in sc of previous row, skip 2, sc in the 3rd dc of the 5dc, skip 2. Repeat from *. Repeat rows 2 and 3 until it measures 20 inches. Hat: Row 1: Chain 1, turn piece over to the side. 70 sc along the side evenly. Row 2: Chain 3, Dc in each stitch across. Repeat row 2 until the entire piece measures 10 inches (including the brim). Cut a long tail and then sew the long sides (the short side of the brim should be meeting). Cut another tail and then weave it along the last row of the dc (make sure it’s tight) and tie off. Flip inside out so you don’t see the seams. Add pom pom. The hat should have a bit of a slouch.
Elizabeth Stitch How To: Multiples of 2 plus 4. Row 1. Hook into 4th ch from the hook and pull up a loop, yarn round hook and into the same st and pull up another loop, yarn round hook and through all four loops on the hook. *ch1, skip 1ch, hook into next st, pull up a loop, yarn round hook and into the same st and pull up another loop, yarn round hook and through all four loops on the hook; repeat from * to end, turn. Row 2. ch3, *hook into first ch1 sp, pull up a loop, yarn round hook, into the same sp, pull up another loop, yarn round hook and through all four loops on the hook, ch1; repeat from * across with last st under turning chain, turn. Repeat row 2 for pattern. The Elizabeth Stitch Headband Hook size and yarn weight does not matter for this pattern. Chain 14 Row 1: Skip first stitch and single crochet until the end of the row. Row 2: Chain 3. Elizabeth stitch in the first stitch and then throughout the rest of the row. There should be 7 Elizabeth stitches in each row. Row 3: Repeat row 2 until headband measures 20 inches or until it wraps around your head comfortably. Single crochet around the entire piece then slip stitch ends/ together using back loops only. And no, I don't mean with fireworks. I'm already done 2 orders, got 2 more on the way that I just need to get the yarn for, looking for craft shows that I can do in the spring, and trying to stock up for them before I even consider signing up for them. Not to mention, I got a banner in the mail last week not even 24 hours after I ordered it. Say what? With that being said, I'm starting to get my things for my New Year's resolution crossed off, one by one. What is it, you may ask? To take my business more seriously... Because that is what The Crochetaholic now is... A business. I've started making some things for spring craft shows that I am looking into and different patterns that I think will sell super well during the spring craft shows. I just recently made a bunny and a water bottle holder just to see how quickly they can be worked up. They can be made up super quick by the way! Like 2 hours kind of quick, both considering it was my first time making them. Over the next little while, I will be testing different patterns to see if things can work out in time for any of the craft shows that I am thinking of doing. I know that what I sell during the spring and summer months will be completely different than what I would sell during the fall and winter months. I'm trying to build up my inventory as time goes on. I seriously can't wait to see what sells and what doesn't during the spring and summer shows! I am feeling really hopeful for this new year. Seriously... Really hopeful! That is a feeling that I rarely have for new years in the past. Party because I never really had anything worth while to be hopeful for. But now, with this new business taking off, things.... and times.... have changed. I am hopeful. I am feeling like a new version of myself. I am starting a new chapter in my life.... with some changes (like the obvious name change). I am glad to be embarking this new chapter of my life! I am really excited for this. New and better things are coming my way this year. I can feel it. 2018 will be my year!
So this year, business wise, has been a great year. Personal wise too. I have learned many lessons on customer service and when to actually pick up payment. I am still learning on how to say NO to orders. Especially if the first order didn't follow through for one way or another. I am working on a few orders at the moment and can't wait to get more orders in during the new year! I have learned new stitches this year and posted three patterns on Ravelry. One of them is over 100 download! I guess I know what people want out of the three patterns that I have up for download. Scarves! I guess I will be trying to make more wearable patterns on ravelry in 2018. I can't wait for 2018 to start. With all the things that I am hoping to do in the new year is remarkable! I want to try to make more of a name for myself as a crocheter. I want to build my business more and more and see what sells and what doesn't. I know what cowls people have been asking for this past season and I can't wait to make a constant stock on that cowl. I am hoping to get a banner soon for future craft shows. I am hoping to design more and more patterns this year too. I am hoping to have a pile of orders on the go and have some kind of consistency with my income with this business that I have started. I am trying to take my business more seriously as it is no longer a hobby. It is now a business. A business that I thoroughly enjoy doing. If I am able to do this full time at some point, I'd be extremely happy. I know I will never be a millionaire with this craft. But I know that people want handcrafted items as they know where they are made and feel comfortable that the item that they purchased is not made in a sweat shop in China and/or uses child labour as so many things use both methods to make profit (I can use Nike as an example. Just look up Swoosh on youtube!). I am still figuring out prices for my stock and can't wait to learn more about the business woman that I am. Wow... it feels good to actually type that out.... Business woman. I really hope that 2018 is going to be my year for my business to grow and flourish! I am always on the look out for new patterns that I can work on and craft shows that I can do. I think 2018 will be the year of the learning my business for me. I'm going to try to keep my receipts together all in one place and to keep track of my sales. I really want to try to expand my business in the upcoming year. For those who use crocheting or knitting as a business, is there any recommendations that you can offer for me who is starting to seriously treat this business AS a business? Anything at all will be helpful!
All the best in the new year! Natalie |
AuthorNatalie lives in southern Ontario in the GTA (Greater Toronto Area). She loves to crochet, read, and spend time with friends and family. Archives
December 2019
Categories
All
|
 RSS Feed
